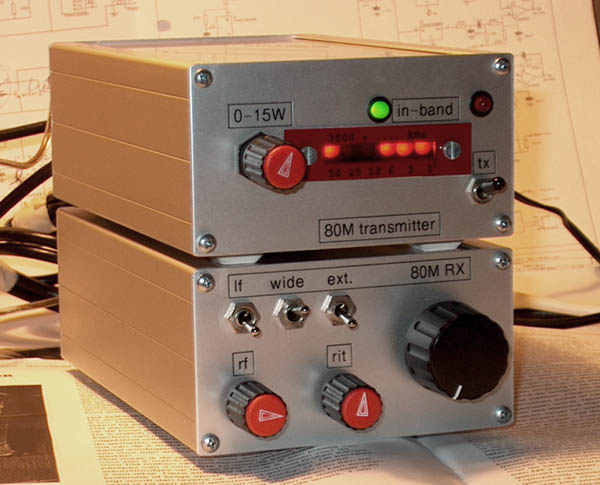
80 METER CW TRANSCEIVER

80 meter band CW transceiver with direct conversion receiver with sideband suppression.
Side band suppression with a direct conversion receiverA very happy end
And here already the result of the experiment so
that you do not have to read the whole story to find that out.
It behaves
just like a good superhet receiver without any spurious responses from mirror
frequencies! Also the sensitivity is very good. Construction was easy with all
good obtainable standard electronic components. Almost nothing is heard on the
unwanted side band. Only some noisy signals from very strong commercial telex
stations and some strong QRO amateurs, but very weak. It is really a pleasure to
listen to this receiver. I am so enthousiast about the performance of the
receiver that I also made a four band version. After a few years the mixer, side
tone oscillator and audio preamplifiers have been modified to simplify and
improve the design.
Side band suppression
The phase method used here to suppress a side band

The phase method used here.
big diagram
The phase method of the 80 meter band receiver
The RF signal is
split into two signals that are shifted 90 degrees out of phase (one plus 45 and
one minus 45 degrees). Both are mixed to audio frequencies. The two audio
signals are again shifted 90 degrees out of phase (again one plus 45 and one
minus 45 degrees). When we add the two signals, one side band is in phase and
added, the signals from the other side band are 180 degrees out of phase and
substracted.
The RF phase shift circuits are simple RC combinations, the
trimmers are adjusted for maximum suppression at 3550 kHz. The disadvantage of
such a simple phase shift network is that the side band suppression is a little
frequency dependent.
For the LF phase shift network I did not use the more
common but complex polyphase network but a simpler version with operational
amplifiers.
Both mixers are a CMOS switch. One 74HC4066 IC contains even four
CMOS switches of which only two are used here! So a very simple and cheap
solution for the mixer!
SCHEMATIC DIAGRAM OF THE VFO (PART OF THE
RECEIVER)

Circuit diagram of the receiver with the VFO
big
diagram
The VFO and RIT
VFO
Did I just mention that it is an advantage that the VFO
frequency is the same as the reception frequency? Indeed, but as this VFO is
also used for the transmitter, it should not oscillate on the working frequency.
This will cause frequency instability during transmission. That is why the VFO
frequency is twice the working frequency: 7000 - 7200 kHz and is divided by two.
It has to be screened!
There is also a temperature compensation circuit with
the NTC. It is adjusted with the 10 k potentiometer while tuned on center
frequency. I did that by measuring the frequency in the evening when the room
temperature was 21 C and in the morning at 15 C. The frequency drift was
improved with a factor 3 by this circuit.
RIT
The RIT is activated by a CMOS switch of the 74HC4066 IC that
also contains the two for the mixers. The RIT on/off switch enables you to
determine the zero position of the RIT potentiometer. At zero position, there
should be no frequency change when switching the RIT on and off. I also made an
input for an external control signal (for example frequency shift for telex or
frequency stabilisation purposes), but I never used it.
SCHEMATIC DIAGRAM OF THE DIRECT CONVERSION
RECEIVER WITH SIDE BAND SUPPRESSION
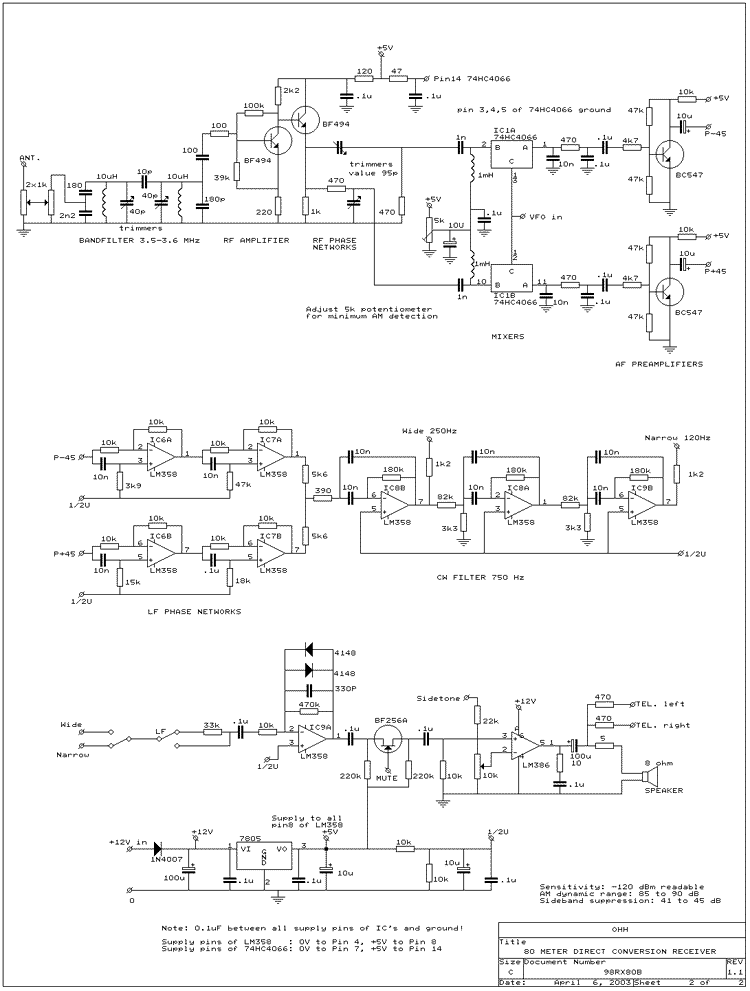
Circuit diagram of the receiver
big
diagram
The receiver in detail
Preselector, RF preamplifier and RF phase shift networks
At the
input, you will find the very useful RF attenuator. It is the main volume
control. The preselector is a bandfilter tuned to 3550 kHz. The RF preamplifier
has some gain, a high input impedance for the bandfilter and a low output
impedance for the phase shift networks. After this preamplifier we have the RF
phase shift filters. It are simple RC networks, both tuned with the trimmers for
approximately 45 degrees phase shift. They also compensate for amplitude
differences. For optimum settings for phase and amplitude, it is possible that
one network is plus 55 degrees, the other minus 35 degrees as long as the
difference is 90 degrees. Adjust it by ear, try different trimmer settings while
adjusting the other at 3550 kHz while listening to a signal on the suppressed
side band.
Usually, phase shifting is not done in the RF signal path but in
the VFO. In that case, the VFO works at 4 times the reception frequency. The 90
degrees phase shift is obtained by dividers. The advantage of phase shift in the
RF part instead of in the VFO circuit is that the VFO can work at the 4 times
lower reception frequency and the RF phase shift network can also be used to
correct for amplitude inaccuracies.
Mixers, LF preamplifiers and LF phase shift networks
The plus and
minus 45 degrees phase shifted signals are mixed to LF frequencies by two
mixers. These mixers are CMOS switches of a 74HC4066, very cheap and performance
is good. Adjust the 5k potentiometer for minimum audio detection of strong
broadcast stations.
To obtain the side band suppression, we also need phase
shift networks in the LF part. The shifts have to be 45 degrees over the whole
LF spectrum we want to receive. The networks in this receiver do their work with
acceptable accuracy from 150 Hz to 5 kHz. However, for this CW transceiver only
frequencies between 400 and 1000 Hz are important. I did use components with an
accuracy of 5 percent with good results. The phase shift networks are a circuit
with two op-amps and a few resistors and capacitors instead of the better but
more complex polyphase networks.
CW filter and audio circuits
Both signals from the LF phase shift
networks are added via 5k6 ohm resistors. Here the summation and substraction of
the wanted and unwanted side bands happens. The wanted side band components are
in phase on this point and are added, the unwanted side band are 180 degrees out
of phase and substracted.
The audio CW filter has to bandwidths, a wide
filter and a narrow filter. The wide filter is more pleasant and less tiring
when listening for long periods, the narrow filter is very good when there is
interference or for digital mode's like Feld Hell.
LF volume control is done
by a switch as there was no place for a potentiometer. The switch lowers the
gain of the next LM358 LF amplifier. The advantage is that not only the audio
signal is decreased but also the noise of the LF amplifier. The diodes are
limiting the peaks of the LF signal to 0.7 volt to prevent overloading of the
BF256A mute switch. Take an =A= type for the BF256 as it has the lowest cut off
voltage.
The LM386 is the final LF amplifier that has sufficient output power
for a loudspeaker.
Modifications for SSB reception
The modifications are simple:
1.
Two capacitors of 0.1 uF after the 470 ohm resistors at the output of the mixers
IC1a and IC1b have to be replaced by 33 nF.
2. After the junction of the 5k6
ohm resistors at the output of the LF phase shift filters, the LF part is
replaced by that described on the page of the shortwave receiver. Check the
correct polarity connections of the elco with a voltmeter. If the LF gain is too
high, increase both 5k6 resistors and that is it!
For SSB reception,
Automatic Volume Control as applied in the LF circuit of the shortwave receiver
is a very pleasant feature.
SCHEMATIC DIAGRAM OF THE
TRANSMITTER
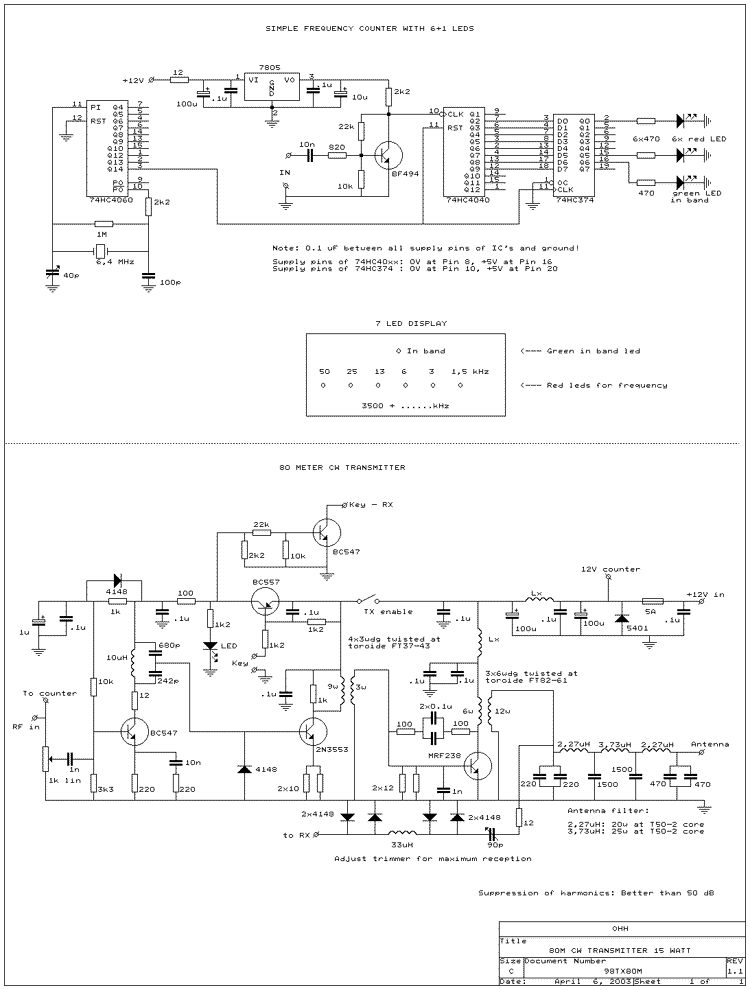
Circuit diagram of the transmitter
big
diagram
The transmitter explained
1st driver stage
With the 1k potentiometer, the output power is
adjustable between 0 and 10 watt. After this potentiometer, the signal is
amplified by a BC547 transistor. The output circuit (10 uH coil and capacitors)
is resonant at 3550 kHz. Adjust the 242 pF capacitor for resonance at that
frequency (maximum output power). It is not critical, it has a wide peak. This
driver is switched by the morse key via the BC557 transistor. The diode and 1 uF
capacitor are added for a correct shape of the CW signal.
2nd driver stage
The second driver is a 2N3553 transistor. The 1k
resistor damps possible oscillations. The 2x10 ohm emitter resistors are a kind
of limiter to prevent overdrive of the stage.
Final RF amplifier
Of course you should not use such an expensive
VHF transistor but for example a 2SC1969. I had a MRF238 transistor unused in
the junkbox.
The 2x 12 ohm at the base create a low input impedance,
important for a good stability. The 1 nF capacitor has a low impedance for
higher frequencies, it prevents HF and VHF oscillations. And finally, the 2x 100
ohm resistors with the 2x 0.1 uF capacitors are a negative feedback circuit that
prevent oscillations at frequencies below 1 MHz.
Due to the 6 element antenna
filter, the suppression of the 2nd harmonic is 53 dB and that of the higher
harmonics are more than 60 dB.
Antenna switch
The 90 pF trimmer is adjusted for resonance at 3550
kHz with the 33 uH inductance. Both anti-parallel diode pairs are limiting the
RF signal from the transmitter to the receiver. The first diode pair is
connected to a point with a very high impedance, so the current via the diodes
at that point is low. The resistor of 12 ohm is a kind of fuse. Smoking if
something goes wrong. The second diode pair is not necessarey. It is just there
as an extra protection if something else in the circuit fails.
Simple frequency counter
The simple frequency counter is described
somewhere else at this website. Six leds are used to display the frequency. One
green led at Q7 is the in-band led (frequency between 3500 and 3600 kHz).
Add
the value of the leds and you know the frequency. For example: Leds 3 kHz, 6 kHz
and 50 kHz are on for 3559 kHz. If you tune a little higher in frequency, the
1.5 kHz led starts burning and you are at 3560.5 kHz, just above the QRP calling
frequency. Turn a little backwards and you are exactly on 3560 kHz. A very
simple circuit and it absolutely not difficult to read out the frequency.
Notes
Built via the ugly method (dead bug method). Parts are
soldered at one side of he double sided unetched print.
The VFO has to be
placed in a screened enclosure. The frequency counter is also screened with
chicken wire.... The advantage is that you can make some modification or
adjustments through the holes of the chicken wire.
Inductances are
commercially available types looking like big resistors. Lx are wired 6 hole
cores.
Do not use a 74HCT type but a 74HC type for the IC's!
I made a
seperate transmitter and receiver, both in it's own enclosure. They are
connected with plugs and cables. The RF signal from the VFO to the transmitter
goes via coaxcable with BNC plugs. The other wiring is with screened audio
cable.
Performance
Sensitivity: -120 dBm (0.2 uV) signals are
readable
AM dynamic range: 85 to 90 dB (good)
Side band suppression:
3500 kHz: 42 dB
3550 kHz: 45 dB
3600 kHz: 41
dB
Note: a few years after the adjustment, the first version had more than 37
dB suppression.
Transmit power: max. 15 W at 14 V
Suppression of harmonics: Better than 50
dB
As said before, I like this receiver, side band suppression is good and I really do not have a need for a commercial superhet transceiver.
PHOTOGRAPHS

Direct conversion receiver with sideband
suppression.
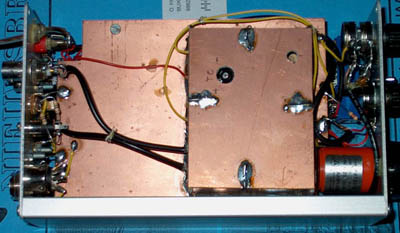
VFO of Direct conversion receiver in a screened
enclosure!

Transmitter
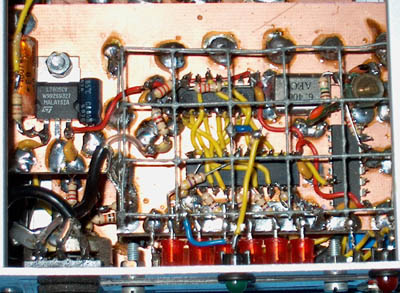
The very simple but efficient frequency counter with
7 leds, only 3 IC's and it's own 5 volt stabilizer.
Screened with chicken
wire...