Getting Started on RTTY - Page 6
Setting Up MMTTY to run AFSK
First off, if
you are currently cabled up to run PSK31 and can run PSK31 successfully, then
you are already cabled up to run AFSK. If not, you will need to run a
cable from your sound card to your radio. The easiest way I know of to
route audio from your sound card to your radio is by using a Heil AD-1 or CC-1
microphone adapter. Heil makes these adapters for their headsets.
They come with a jack for both audio in and PTT. And for $17 (current
price for an AD-1), it sure beats having to find another mic plug or soldering
into an accessory plug. They make these adapters for most kinds of
radios. If you already own one of these adapters, you're in
business. Check the Heil
Website for more information.
If you use the Heil adapter, you only need to connect the sound
card to the adapter with a male-to-male 1/8" mono phone plug cable for
audio.
Much like receive audio from radio to sound card, the circuit is
the same going back the other way for transmit. Even though I use FSK, I
do use this circuit when running AFSK for PSK31 operation. I placed a 47k
ohm mini-potentiometer across the microphone input to further reduce the audio
going into the transmitter. Remember, if you hit the mic input with too
much audio you run the risk of overdriving and distorting of your transmit
signal.
Again, if you own a RIGblaster, MFJ or Bux Comm interface, this "type" of circuit is already included in the unit.

Courtesy of W5BBR http://www.w5bbr.com/
Once you have this cable in place and if you are going to use VOX, you are ready to transmit. If you decide to key PTT from a serial COM port instead of using VOX, you can build a simple circuit as shown below and connect it to your COM port. Notice that this is the exact same circuit as shown on the previous page to key FSK.

Before attempting to transmit. Bring up MMTTY and go to
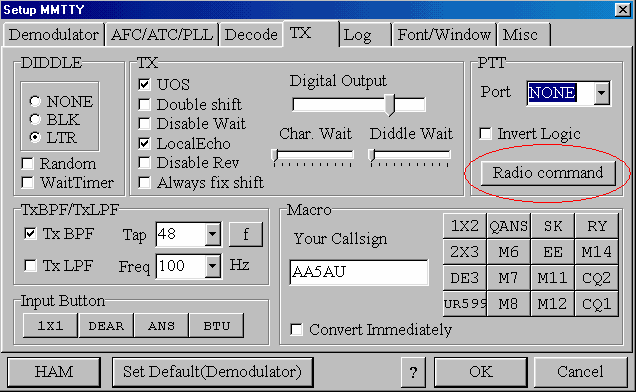
MMTTY setup (Options, Setup MMTTY). Go to the TX tab. In the upper
right hand corner you will see PTT Port. If you are going to use VOX or
Radio command to key PTT, the Port should be set to NONE. If you are going
to use an interface circuit (homebrew or commercial) from a serial COM port to
key PTT, you need to set the Port to the COM port number this interface is
connected to.
If you are going to use Radio command to key PTT (remember
Icom radios do not support PTT via radio command), click on the Radio command
button.

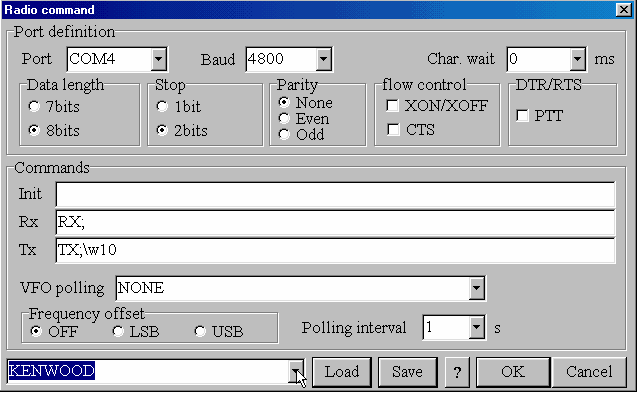
When the Radio command screen appears, select the Port your radio is connected to and set the Baud rate, Data length, Stop bit & Parity for what is needed to communicate with your radio. Then go to the bottom of the screen and select which type of radio you are using. If you are not sure what parameters you need to set, refer to the operator's manual for your radio. (Note: Most radios will probably communicate using 9600 baud, 8 bits, 1 stop pit, and parity none.) Below are settings I use to control my Kenwood TS-870 transceiver which is connected to serial COM port 4 on my PC. (Note: The TS-870 will work with 8 bits, 1 stop bit & no parity with MMTTY, but I prefer to set it to 4800 baud with 2 stop bits because that is what I must use when interfacing my radio to another program. This way, I don't have to change the setting in the radio when I switch between programs). Click OK which brings you back to Setup.

When you get back to the Setup MMTTY screen, click on the Misc tab. If you clicked NONE as the COM port in the TX window, then you will only have one option in the TX Port section - Sound. If you set up to key PTT from a serial COM port in the TX tab, the other options will be available, but for AFSK, you must select Sound. Select Sound, then click OK to get back to the main MMTTY screen.

You are now ready to transmit RTTY using AFSK. Connect
your radio to a dummy load. Turn your Power output control all the way up
and your Mic Gain all the way down. Put your radio in the LSB position and make
sure your speech processor is turned off. Key your radio by either
clicking on the TX button in the main MMTTY window with your mouse or press the
F9 key (F9 toggles TX on and off). With Monitor turned on in your radio,
you should hear diddles in your headphones or coming out of your radio's
speaker. Diddles are a term used for RTTY being transmitted in an idle
state. If you don't hear diddles or to find out what diddles are, what
they do and what they sound like, check out Page 11. (Diddles
& Transmit Troubleshooting).
If you hear
diddles, you are off to a great start. You are transmitting RTTY.
Now slowly increase your mic gain while watching the ALC meter on your
radio. Increase the mic gain until you see the ALC meter start to move
above zero then stop. Now turn the mic gain down slightly until your ALC
reading is just back to zero. Now look at your output power. If you
are near full output power, you are set up correctly.
If you are not
near full output power of your transmitter, then the level of audio coming from
your sound card is too high. If you don't get any ALC, then the audio
going into the radio is too low. Too low is better than too high.
The idea is to decrease the audio going into your radio until full output power
can be obtained and still have little or no ALC on the meter. This why a
potentiometer across the audio input to the radio is a good idea. If you
are not using a potentiometer or some kind of resistive pad, you can attempt to
turn the audio output of the sound card down in the Windows Volume Control
panel. If your audio is too low, you can attempt to increase the level in
the Windows Volume Control. However, experience has shown that this
adjustment is very coarse and hard to control. You may find that you will
have to have this control set nearly to zero to get the audio level low enough
to be acceptable in most cases without using a potentiometer or pad.
Normally the problem is audio too high.
Once you have achieved nearly
full output power with no ALC, then you are ready to go on the air!
If
you wish, set up some transmit buffers following the MMTTY help files.
Listen around for someone calling CQ or generate a CQ yourself. This
completes setting up for AFSK transmission. FSK transmission is detailed
on the next page.
![]()