Cross-Country Soaring 2004
![]() User Guide
User Guide ![]()
7.1 Thermal Soaring
As the sun heats the earth, the earth in turn heats the air near its surface. Since warmed air drops in density and is thus lighter than the surrounding air, this warmed air at the surface eventually breaks away from the surface and rises. As the air rises, it cools, and it continues to rise until it either reaches air that is equal in temperature or until it reaches air at the dewpoint temperature, in which case a cloud is typically formed. Such a rising mass of air is known to soaring pilots as a “thermal”. In general, thermals originate at places on the surface that are warmer than their surroundings and often break off at disturbances, or "triggers", on the surface. Thus dry, dark fields and parking lots are good thermal generators; and trees, buildings, and hills are good triggers.
Unfortunately, it is unknown yet how to create clouds dynamically in FS or how to find the coordinates in FS of likely thermal generators or triggers, so Cross-Country Soaring (CCS) places thermals completely randomly and does not create cumulus clouds atop thermals. The only exception to random placement is in scripted mode, where it’s possible (with some extra user effort) to have thermals coincide with static scenery clouds.
The typical soaring day starts with weak thermals that build to peak strength in the early afternoon and wane in strength until sunset. The peak heating time of the day is naturally the time when the sun's rays most directly hit the earth, or what soaring pilots refer to as "noon, local sun time". Because it takes time for the surface to heat, though, the time of day for peak thermal activity is typically an hour or two after "noon, local sun time". This daily thermal strength cycle makes it more difficult to stay aloft in the early morning or late afternoon. In CCS, there is no thermal lift before 10:00 AM or after 6:00 PM. Thermal strength gradually increases from zero to the day’s peak from 10:00 AM to 1:00 PM. Average thermal strength stays steady at this peak from 1:00 PM to 4:00 PM and then gradually decreases back to zero from 4:00 PM to 6:00 PM.
CCS controls all thermal positions and characteristics (strength, size, amount of lean, etc.). If desired, you can customize soaring conditions using the CCS Control Panel (see Customizing Soaring Conditions). Also, in scripted mode it’s possible to define thermal positions manually by basing the script file on a Thermiek project file.
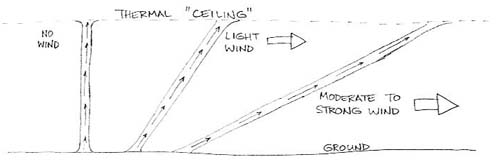
To find a thermal, simply press TAB-W or TAB-E. Each key combination will give you the compass (magnetic) bearing and distance to a nearby thermal. TAB-1, TAB-2, and TAB-3 will provide the same information for the three user-defined thermals (only in single-player mode and if enabled, see House Thermals). These key combos give you the thermal’s position at your current altitude. Since thermals lean downwind (see figures below), expect the reported position to “move” upwind as you descend (while flying towards it). Also, if flying crosswind towards a thermal, you’ll need to “crab” into the wind a few degrees to fly a straight line towards the thermal. If you’re new to these type wind effects, practice in calm winds first, and gradually work your way up to moderate winds.
The stronger the wind, the more thermals lean…
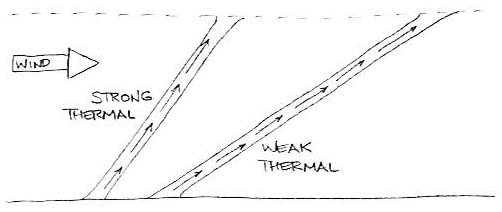
A strong thermal leans less than a weak one…
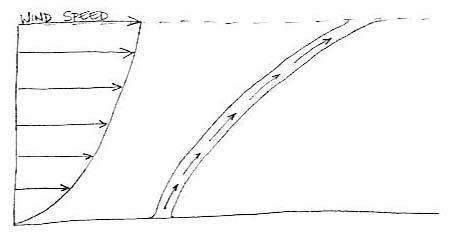
Increasing winds with altitude will cause the thermal to lean more at higher altitudes…
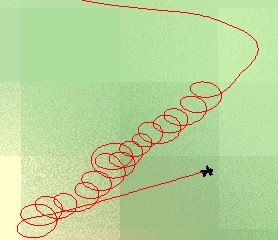
Here’s a view from above showing the leaning of a thermal in wind…
Once you've found a thermal, you must maneuver to stay in it. The thermal can be envisioned as a circular column with the strongest lift at the center, diminishing lift towards the edges, and sinking air around the lifting air. Since each thermal has a limited duration and you don't know when you find one how long it's already existed, you must quickly establish yourself in it and in the area of best lift to gain the most altitude. In addition to each thermal having a limited “lifespan”, each thermal has a building (in strength) period of a couple of minutes at its beginning and a weakening period of a couple of minutes at its end.
Once you find a thermal, slow to around minimum sink speed,
so you can fly a smaller circle and thus stay nearer the thermal's core.
Don't start turning immediately upon entering a thermal, though. Wait
until your climb rate levels out or drops off slightly, so you can know that
you haven't turned even before even reaching the core. A common technique
for maintaining a good circle around the core is to increase bank as climb rate
decreases and decrease bank as climb rate increases. A continuous
compromise must be made between bank and climb rate. A steeper turn
increases the glider's sink rate but allows it to get nearer the core (flying
in smaller circles), while a flatter turn minimizes the glider's sink rate but
keeps it farther from the core (flying in larger circles). Use the
“cheat” keys often at first to help you stay in thermals, and use
them less and less as you get better at it.
Normally,
the temperature of the atmosphere (in the altitude range in which soaring is possible,
anyway) decreases at a fairly standard rate with altitude. This is a fundamental characteristic of
nature that makes thermals possible.
Thermals are generally best when this rate of decrease is the
greatest. If this rate is low (i.e.,
little decrease in temperature with altitude), then a thermal won’t rise
as high and won’t rise as quickly.
Technically an “inversion layer” is a layer of air in which
the natural behavior is “inverted” – the air gets warmer
with increasing altitude. This can be
devastating to thermal heights or can at least significantly weaken thermals as
they climb through this layer.
CCS
allows you to define one inversion layer below the lift ceiling. Of course, if you’ve set up conditions
such that the lift ceiling doesn’t coincide with a cumulus cloud layer,
then the lift ceiling can be thought of as an inversion itself. The user-definable inversion is modeled as a
layer that gradually weakens thermals from its lower and upper edges to its
center. For example, if you define a
1,000’ thick inversion layer, you can expect the following when climbing
through the inversion in a thermal. As
you begin climbing into the inversion layer, the thermal will weaken. It will continue to weaken, until you reach
the half-way (500’ above the bottom) point. As you climb above the strongest part
(middle) of the inversion layer, the thermal will gradually re-strengthen,
until it reaches normal strength again 500’ above the middle of the inversion. See Inversion
Layer Settings for instructions on creating an inversion layer in CCS.